Hey guys! I’m Christy from The Girl Who Ate Everything. Today I’m sharing Cookie Cutter Peppermint Bark. You know the really good but expensive peppermint bark from Williams and Sonoma? Yeah. You can totally make it at home for way cheaper and it makes great gifts.

A little twist I like to do is make the bark inside of a cookie cutter so not only are you giving a tasty treat but you are giving away a cute cookie cutter as well.

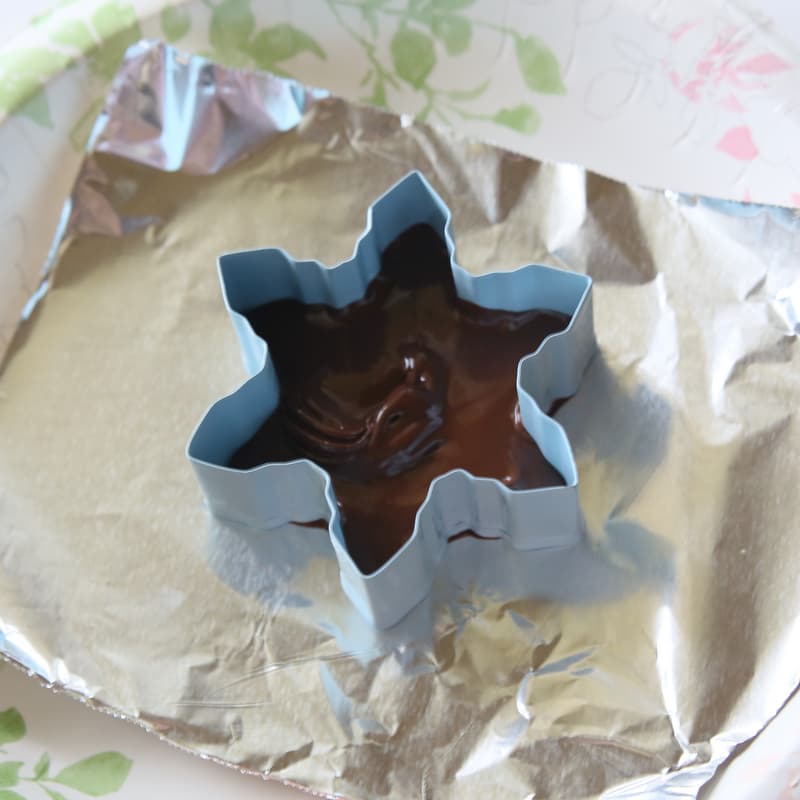
Start by picking out a cute cookie cutter. I found them cheap at Walmart in sets of 2 for just over $1. You can’t beat that. Next, melt your dark chocolate. You can use the nice bars of chocolate like Lindt or Ghirardelli which melt nicely. You can get away with using chocolate chips as well. That’s what I used here because it’s what I had on hand. I used a piping bag because I was making a LOT of these for gifts but you can just melt it in a bowl. Pour a thin layer into the cookie cutter and shake it around to create an even layer.

Place it in the freezer to harden for about 10 minutes.
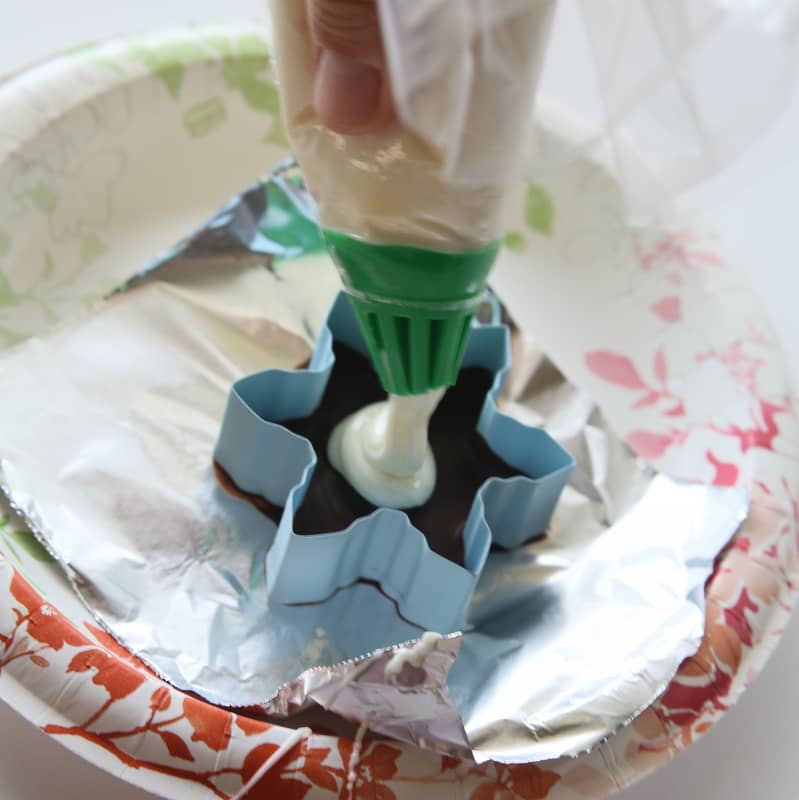
Next, you will do a layer of white chocolate. Here you’ll want to go with high quality chocolate like the bars or almond bark. White chocolate chips tend to seize up easily when heated so I don’t recommend using those. Mix in a little peppermint extract and crushed candy canes and pour it on top of your chocolate layer.
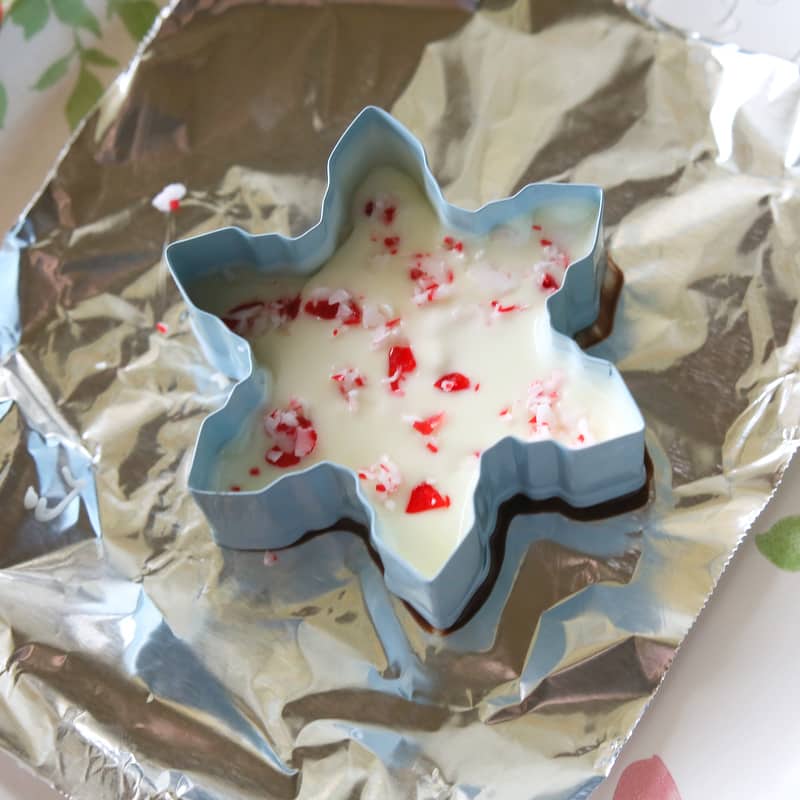
Sprinkle some additional crushed candy canes on top and let the chocolate harden in the freezer. Look how cute this gingerbread man is?

You’re done. So easy, right? You can either pop the chocolate out of the cookie cutter or leave it in. Either way, it’s a great gift! This can also be made in one big layer in a 9×13 pan and then broken into pieces once hardened.

Hey guys! I’m Christy from The Girl Who Ate Everything. Today I’m sharing Cookie Cutter Peppermint Bark. You know the really good but expensive peppermint bark from Williams and Sonoma? Yeah. You can totally make it at home for way cheaper and it makes great gifts.
A little twist I like to do is make the bark inside of a cookie cutter so not only are you giving a tasty treat but you are giving away a cute cookie cutter as well.
Start by picking out a cute cookie cutter. I found them cheap at Walmart in sets of 2 for just over $1. You can’t beat that. Next, melt your dark chocolate. You can use the nice bars of chocolate like Lindt or Ghirardelli which melt nicely. You can get away with using chocolate chips as well. That’s what I used here because it’s what I had on hand. I used a piping bag because I was making a LOT of these for gifts but you can just melt it in a bowl. Pour a thin layer into the cookie cutter and shake it around to create an even layer.
Place it in the freezer to harden for about 10 minutes.
Next, you will do a layer of white chocolate. Here you’ll want to go with high quality chocolate like the bars or almond bark. White chocolate chips tend to seize up easily when heated so I don’t recommend using those. Mix in a little peppermint extract and crushed candy canes and pour it on top of your chocolate layer.
Sprinkle some additional crushed candy canes on top and let the chocolate harden in the freezer. Look how cute this gingerbread man is?
You’re done. So easy, right? You can either pop the chocolate out of the cookie cutter or leave it in. Either way, it’s a great gift! This can also be made in one big layer in a 9×13 pan and then broken into pieces once hardened.
Cookie Cutter Peppermint Bark
Festive peppermint bark made in fun holiday shapes.CourseDessertCuisineAmericanCook Time1 hourServings12 servingsCalories643kcalAuthorLeigh Anne Wilkes
Ingredients
- 24 oz semi-sweet chocolate see Note
- 24 oz white chocolate see Note
- 1/2 tsp peppermint extract
- 2-3 Tbsp of crushed candy canes more for topping
Instructions
- Place a piece of foil on a plate and place the cookie cutter in the center.
- Melt the semi-sweet chocolate in a microwave safe bowl in 30 second intervals until melted, stirring in between.
- Pour the semi-sweet chocolate in the center of the cookie cutter, about 1/4 thick. Make sure you keep pressure on the cookie cutter so the chocolate doesn’t leak out the bottom. Shake the plate slightly to even out the chocolate. Place in the freezer for 10-20 minutes or until hardened.
- Melt the white chocolate or almond bark in a microwave safe bowl in 30 second intervals until melted, stirring in between. Stir in some peppermint extract and crushed candy canes. Add more to taste.
- Pour a 1/4 inch layer of the white chocolate on top of the hardened semi-sweet chocolate layer. Shake to even out and sprinkle additional crushed candy canes on top. Place in the freezer to harden.
- Once completely hardened, you can pop the peppermint bark out of the cookie cutter or leave it in to gift to someone. Wrap in cellophane and cute bow.
- This bark can also be made in a 9X13 pan for a sheet of peppermint bark and then broken into pieces once hardened.